The vendor list is the team’s shared directory of the DMCs, lodges, tour operators, transfer companies and cruise lines we book. It is in the Advisor Portal sidebar under Suppliers, then Vendors. You can also press Ctrl K and type “vendors”. Every advisor can search it, add to it and update it.
Finding a vendor
Type in the search box at the top of the list. One search looks at five things: the vendor’s name, its description, its city, its country and its regions. So “Queenstown” finds every vendor based there whatever it is called, and “Fiji” finds every vendor that covers Fiji.
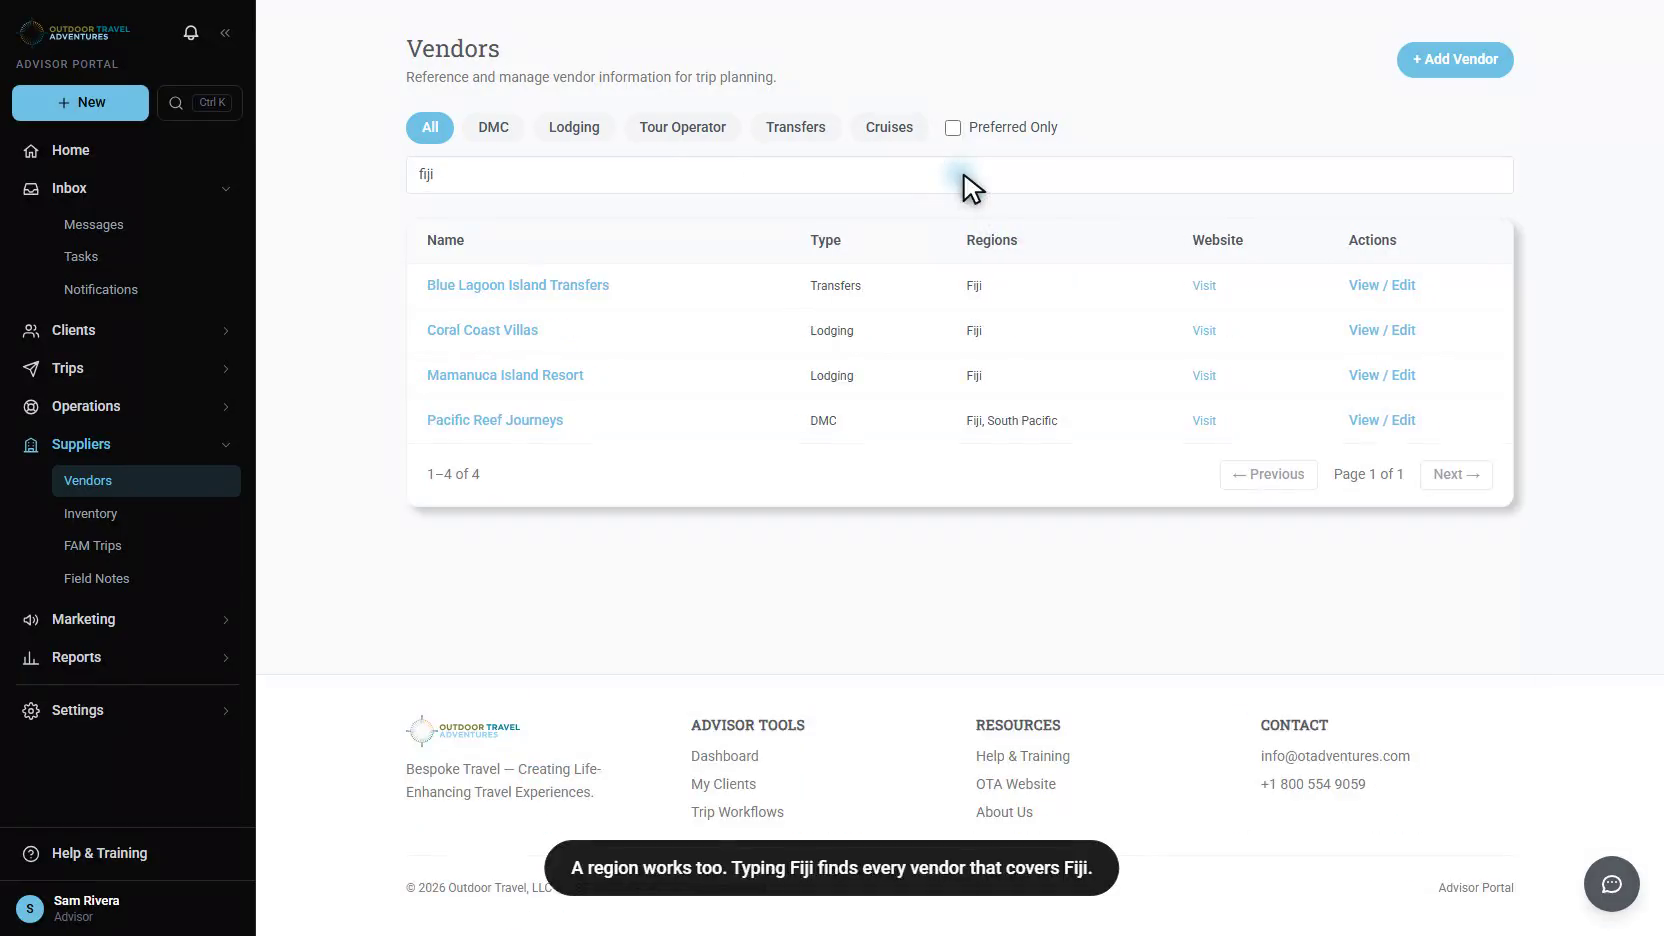
- Type buttons. All, DMC, Lodging, Tour Operator, Transfers and Cruises narrow the list to one type of vendor.
- Preferred Only. Tick it to see just the vendors marked as preferred.
- Payment method. The list beside Preferred Only narrows the vendors to one payment method. Its last choice, Payment method not recorded, finds the vendors nobody has asked yet.
- Together. The search, the type button, Preferred Only and the payment method list all apply at once. If a vendor you expect is missing, check that the type is back on All, the box is unticked and the list is on Any payment method.
- Pages. The list is in name order, 25 to a page. The count at the bottom left shows how many vendors match, and Previous and Next move between pages.
Each row shows the name, type, regions, payment methods and a Visit link that opens the vendor’s website in a new tab. Click the name, or View / Edit, to open the vendor.
Adding a vendor
Search for the vendor first, so you do not create a duplicate. Then:
- Click + Add Vendor at the top right of the list.
- Type the vendor name.
- Choose the vendor type.
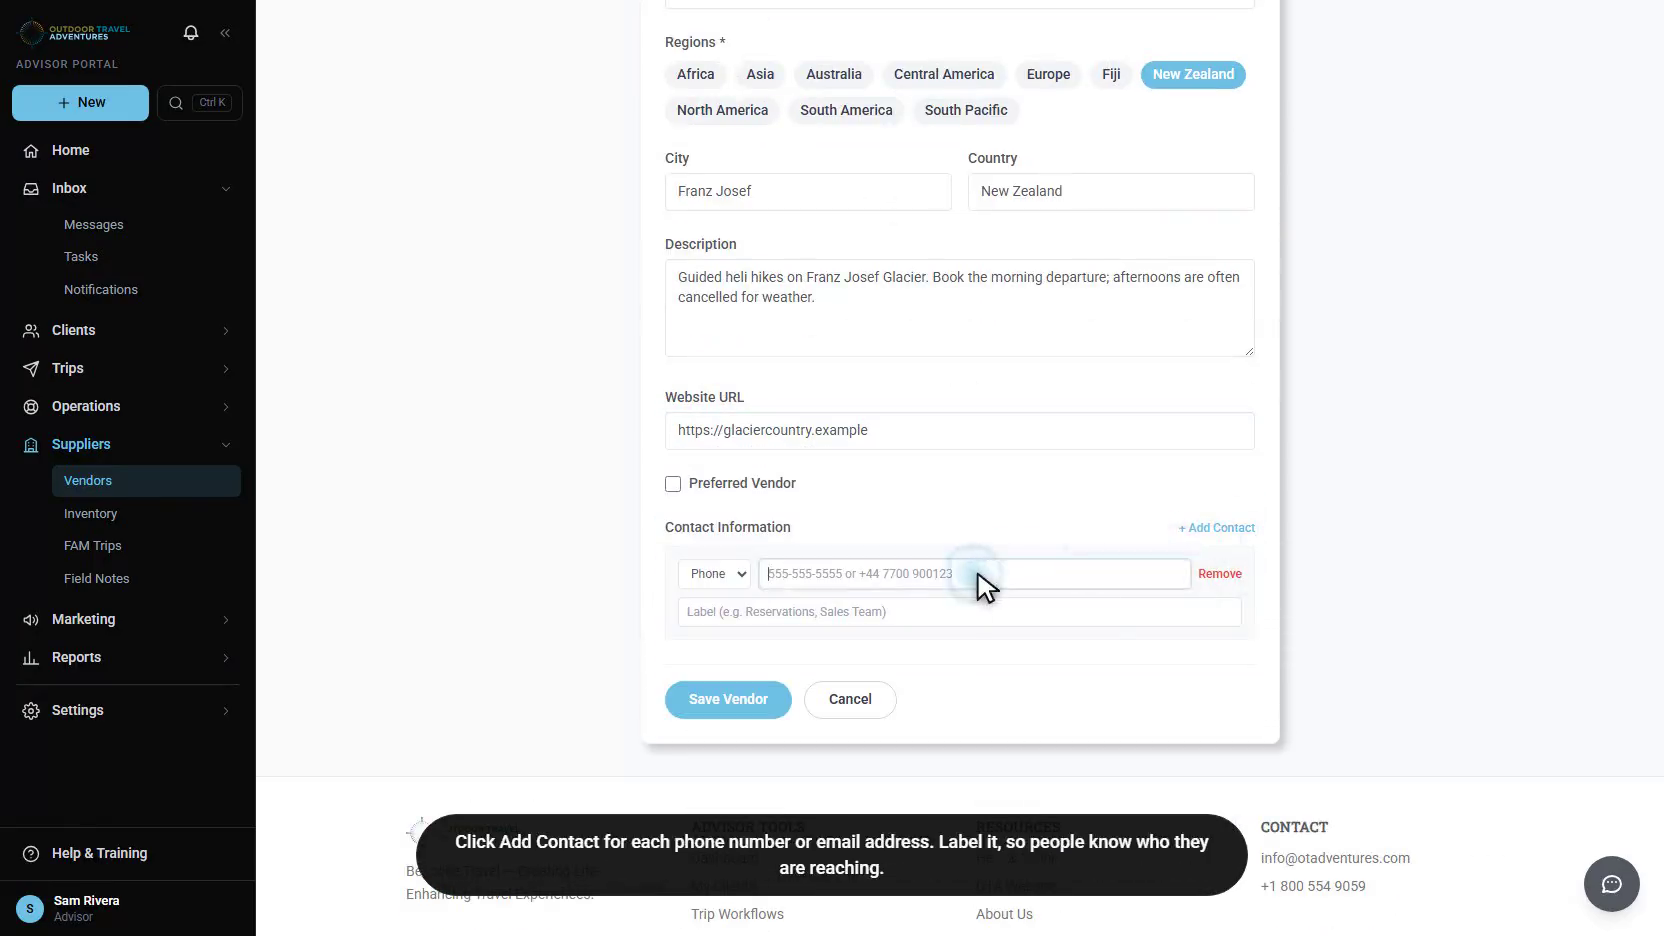
- Click each region the vendor works in. A selected region turns blue; click it again to take it off.
- Fill in the city and country where the vendor is based.
- Add a description, the website, and at least one contact. Then fill in Payment & Commission, described below.
- Click Save Vendor. Nothing is kept until you do; Cancel or Back to Vendors leaves without saving.
| Field | Required | What to enter |
|---|---|---|
| Vendor Name | Yes | The name the vendor trades under. |
| Vendor Type | Yes | One type from the list. |
| Regions | Yes, at least one | Every region the vendor operates in. This is how the rest of the team finds a vendor for an area. |
| City | No | Where the vendor is based. Searchable. |
| Country | No | The vendor’s country of operation. Searchable. |
| Description | No | What they do well, when to use them, anything a colleague should know before booking. Searchable. |
| Website URL | No | The full address, starting with https://. |
| Preferred Vendor | No | Tick for a preferred partner. |
| Contact Information | No | Click + Add Contact for each phone number or email address. Choose Phone or Email, enter it, and add a label such as Reservations or Sales Team. |
Phone numbers format themselves as you type. For a number outside the US, start with + and the country code, for example +64 3 555 0142.
Payment & Commission
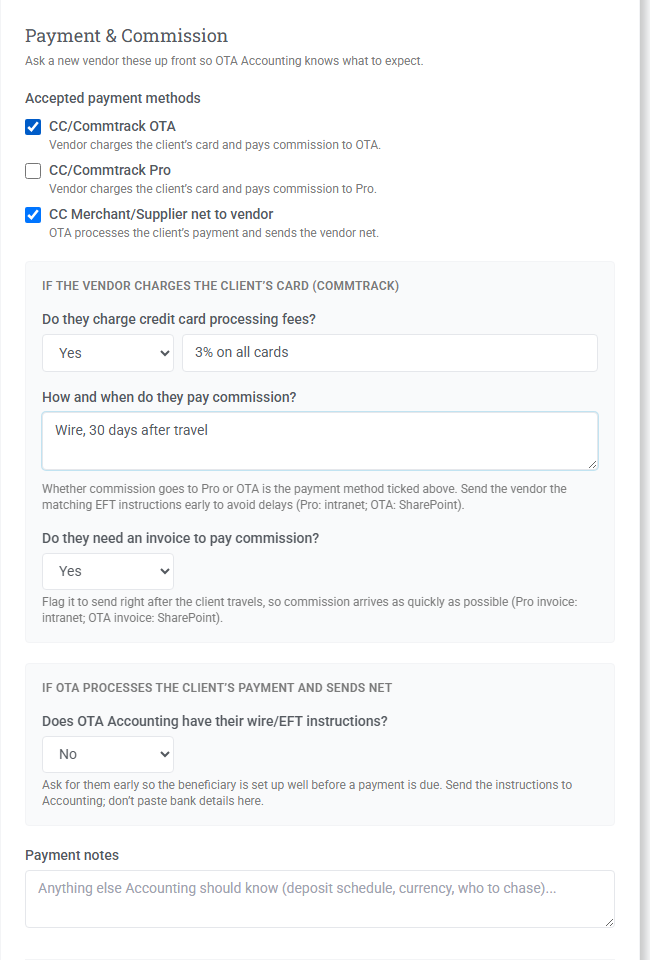
This section of the vendor form records how the client pays and how commission reaches us, so OTA Accounting knows what to expect. Ask a new vendor these questions up front; they are the ones in the New Vendors section of the Operations Manual. None of the fields is required, and each Yes / No answer can stay on Not asked yet until you know it.
| Field | What to enter |
|---|---|
| Accepted payment methods | Tick every one the vendor accepts. CC/Commtrack OTA: the vendor charges the client’s card and pays commission to OTA. CC/Commtrack Pro: the vendor charges the client’s card and pays commission to Pro. CC Merchant/Supplier net to vendor: OTA processes the client’s payment and sends the vendor net. |
| Do they charge credit card processing fees? | Yes or No, and the fee itself in the box beside it, for example “3% on all cards”. |
| How and when do they pay commission? | For example “By wire, 30 days after the client travels”. Send the vendor the matching EFT instructions early to avoid delays: Pro’s are on the intranet, OTA’s are on SharePoint. |
| Do they need an invoice to pay commission? | Yes or No. If Yes, send the invoice right after the client travels so commission arrives as quickly as possible. |
| Does OTA Accounting have their wire/EFT instructions? | For vendors we pay net. Ask for the instructions early and send them to Accounting. Do not type bank details into the vendor record. |
| Payment notes | Anything else Accounting should know: deposit schedule, currency, who to chase. |
The payment methods you tick appear in the Payment column of the vendor list.
Updating a vendor
Click the vendor’s name, or View / Edit at the end of its row. The same form opens with everything filled in.
- Change whatever is out of date.
- To add a contact, click + Add Contact. To take one off, click Remove beside it.
- Tick or untick Preferred Vendor if that has changed. After you save, the page shows who changed it and when.
- Click Save Vendor.
Please update a vendor whenever you learn something new during a booking or a meeting: a new reservations contact, a changed website, a region they have started covering, a change in how they are paid or pay commission.
Comments
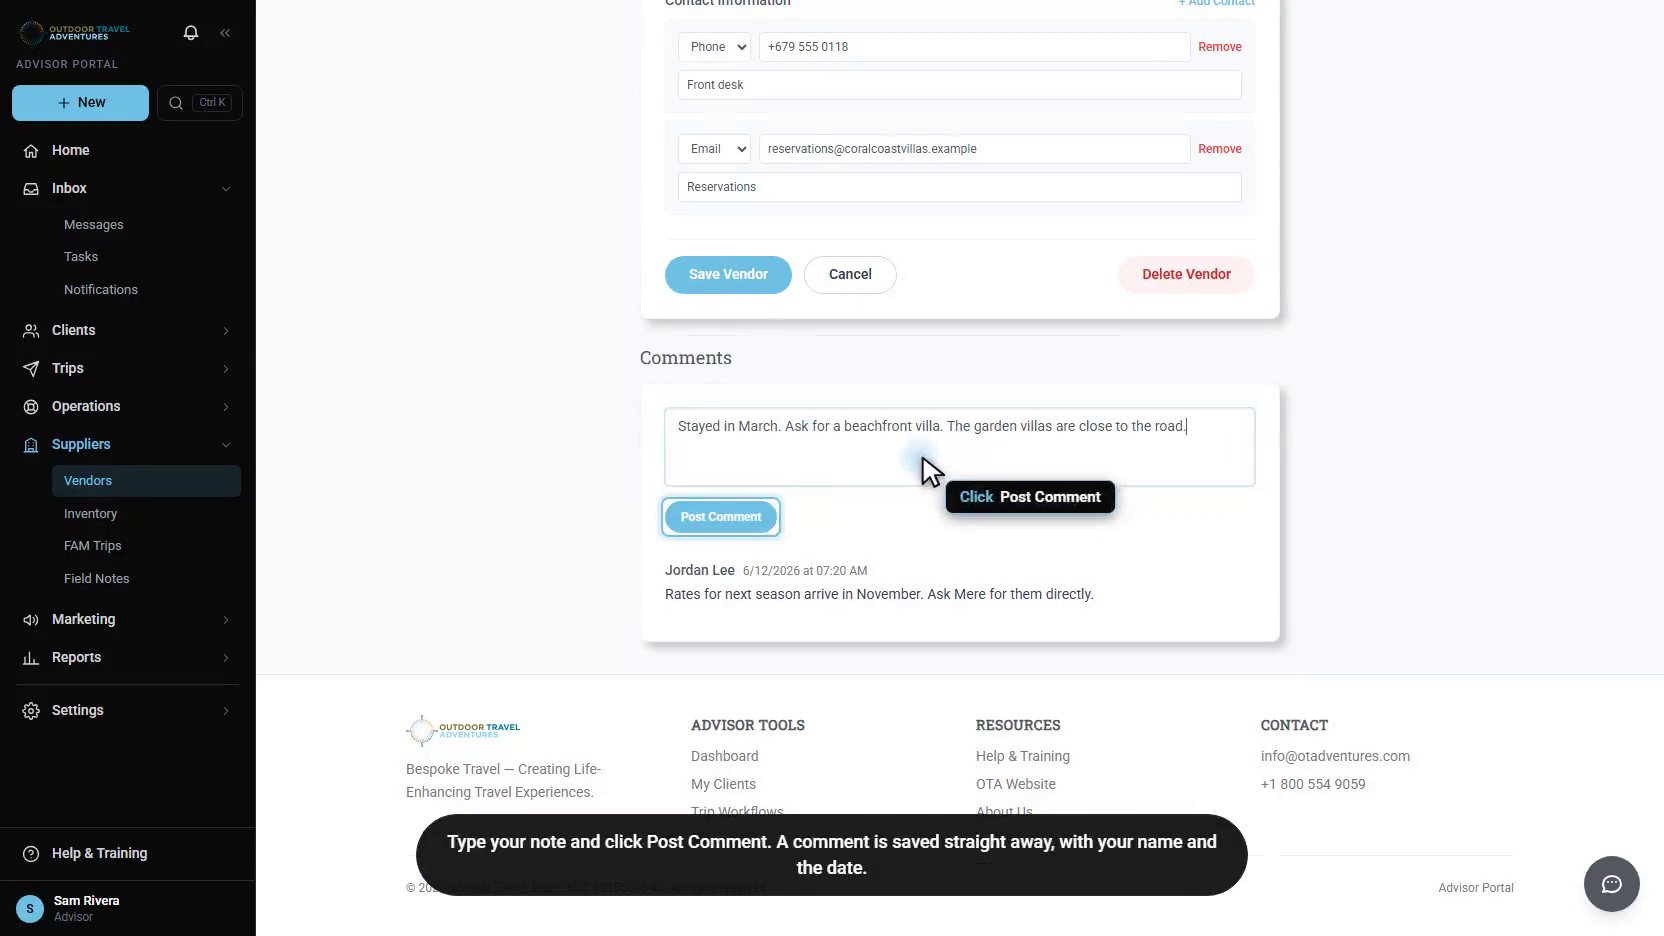
Comments are the team’s running notes on a vendor: how a stay went, a change in rates, who to ask for. They sit below the form when you open an existing vendor, newest first, each with the writer’s name and the date.
Type your note and click Post Comment. A comment is saved straight away; it does not wait for Save Vendor. A new vendor has no comment box until it has been saved once.
Deleting a vendor
Delete Vendor is at the bottom right of the form when you open an existing vendor. It asks you to confirm, then hides the vendor from the list for everyone. Use it only for a duplicate, or a vendor that has closed. A deleted vendor is hidden, not erased, so the portal team can bring it back if it was removed by mistake.
Watch it
The walkthrough video, “Finding, Adding and Updating Vendors”, is on the portal’s Help & Training page. It runs about five minutes, is narrated, and uses sample vendors.